I had the idea to try creating a copy of my iphone wallet case. I knew if I could get it to work it would be a great gift card holder because my case has little slots inside for cards.
So this is my real phone and case and my copy. I'm really pleased with how it turned out :)
Here's how I did it :
Firstly cut a piece of cardstock approx 5 3/4 x 5", score in half and position largest rectangle die off folded edge as shown and diecut.
Diecut another large rectangle and cut off 1 end so that it's 1 3/4" long. Score it at 5/8" and 6/8" with straight edge against score board. Repeat this step with patterned paper.
Adhere the 2 trimmed rectangles to the inside of "case". I decided to leave the edges near the middle open for ease of getting cards in and out. They fit snuggly and there is no chance of them moving.
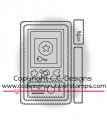
For the "phone", I used white gloss card for a bit of extra realism, but ordinary white would work too. These are the dies I used to create it: This time using the second largest rectangle, so that phone is slightly smaller than the case.
You could cut your stamped image out using the same size rectangle die as the phone or just cut a small rectangle to fit behind the "window".
I also cut a piece of acetate to place over the top of my stamped image and behind the window. It made it look more like a phone screen but if you don't have any, you don't really need it :) I used pop up adhesive dots to attach the phone to the case.

I had already coloured up this super-cute Pollycraft stamp called Pixie and decided to use it as the image in my phone. But one of the new teenager stamps would have been really wonderful to use. Or if it ever happens that you're not in a colouring mood, you could use a real photo instead - that would be great too. I also used a little rectangle and corner rounded it for a sentiment card. I just stamped the birthday sentiment at the top and left the rest blank for a personal message.
 |
Thanks for dropping by today :)
Kathy


Hi Kathy,
ReplyDeletereally a cool and adorable idear! The paper you used looks so beautiful and your creation is
trés chic.Thank you for this great inspiration and your little workshop,how to do make it,
hugs die waldfee
Kathy,
ReplyDeleteThis is a beautiful gift card holder!! Love the design. A word of caution though, I've been told that magnets can mess up gift cards. You might want to try a little velcro instead.
Woww what a wonderful idea... fabulous detail and of course, I LOVE that image too!
ReplyDeleteChristine x
That is so clever, I love it! Beautiful image and colours. Creative Blessings, Tracy x
ReplyDeleteThis is such a fun idea!
ReplyDelete